


You will need:
1. SSE2/SSE3 enabled processor: Download WCPUID application and run it. See if your processor is supported.
2. Mac OSx86 'Deadmoo' image: If you can find it, then you can install it. Google for torrent and pheNIX. Find the Marklar-Tiger.dmg. A .dmg file is a disk image of Mac OS X.
3. DVD Burner and DVD ROM
4. UltraISO: Download it from here. Trial version works for us.
5. A Patch :) - Google for Generic_OSx86_Install_DVD_Patcher_Release1.rar and download this file.
6. Partition Magic (or any other partitioning software)
7. Windows bootable disc: Your Win XP installation CD works and we need this just to be on the safe side.
Creating the DVD:
After downloading the DVD image, convert the .dmg file into an .iso file using Ultraiso. Launch Ultraiso, go to tools, select convert. Find the .dmg file and save it as an .iso file.
Unrar the patch file (point 5 - see above) and Marklar-Tiger-patch-release1 file inside the original rar file. Run ppf-o-matic3 and select the newly created .iso file and select Marklar-Tiger-patch-release1.ppf file in the Marklar-Tiger-patch-release1 folder. Click on the Apply button. Now you have a patched version, that should install on most hardwares although you would still need SSE2/SSE3 enabled processors.
Now burn the .iso file onto a blank DVD.
Creating Partitions:
Make sure you have two partitions and also make sure that the Mac OSx86 partition has more than 6 GB in it. If you already have this setup and Win XP installed, then you can proceed to the installation step. Otherwise, you can google for creating two partitions using Partition magic. This is basic stuff and anyone should be able to do it.
Installation:
Insert the burnt DVD in your DVD ROM. Make sure your BIOS is able to boot from DVD before a hard disk. Now you will be presented with a boot menu, that looks something like this:
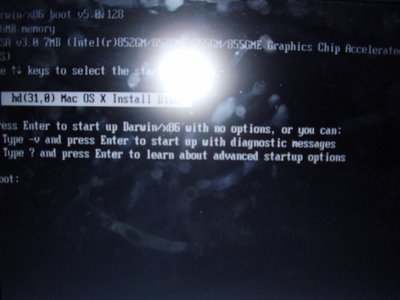
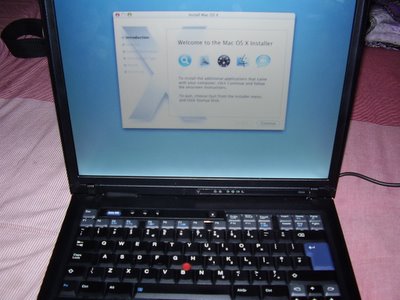
Press enter to proceed. After the spining ball, you should see the Mac OS X installation setup.
Click on Utilities in the top menu and select Disk Utility. This would show you two partitions in it. Select the non-WinXP partition and format it as Mac OS Extended (journaled) - PLEASE NOTE: Make sure you select the correct partition. If you don't (and in some cases, even if you do) you might lose all stuff on the hard disk, so be very CAREFUL. Don't blame me, if you lose data or if your computer starts acting wierd.
Once you have completed the formating of the partition, you can quit Disk Utility (press alt-Q on the keyboard). Now you will be back in the setup. Now you can simply do a next, next, next to complete the installation. Advanced users can choose not to install printer drivers by clicking on the customize button during the setup. Once, your installation is complete, your computer would reboot.
Boot from the Mac OSx86 DVD again and hit enter at the boot menu. When the Mac OS X setup starts again, goto Utilities (in the top menu) and select Startup Disk. It would show three disks - Win XP Partition, Mac OSX Partition and the DVD Drive (your options might differ). Select the Win XP partition and reboot the computer. Remove the Mac OSx86 DVD and let your computer boot normally. Now, your computer would boot into Windows XP. Login with an administrator account. Goto Start menu --> Run --> Type "compmgmt.msc" and hit enter. In the left hand column, under the storage menu, select 'Disk management'. Now right-click on your WinXP partition (most probably C drive) and select 'Mark partition as active'. The last step allows you to boot to Windows XP without a bootable disk.
Now go to 'Start Menu' --> Run --> type 'cmd.exe' and hit enter. Now type the following:
1. c: [hit enter]
2. cd \ [hit enter]
3. debug.exe [hit enter]
Now paste the following:
N CHAIN0
E100 fa 31 c0 8e d0 bc f0 ff fb 8e c0 8e d8 be 00 7c
E110 bf 00 e0 fc b9 00 01 f2 a5 ea 1e e0 00 00 66 31
E120 c0 66 a3 91 e1 a2 95 e1 b4 41 bb aa 55 cd 13 72
E130 0e 81 fb 55 aa 75 08 f6 c1 01 0f 95 06 95 e1 b0
E140 01 31 db 8e c3 bb 00 10 89 de c7 04 00 00 c7 44
E150 02 01 00 66 c7 44 08 00 00 00 00 e8 b2 00 72 08
E160 bf be 11 b4 00 e8 0f 00 fe c2 f6 c2 04 74 af be
E170 7b e1 e8 f6 00 eb fe 51 56 81 7d 40 55 aa 0f 85
E180 8b 00 89 fe b9 04 00 80 7c 04 ab 74 0f 80 7c 04
E190 a8 74 09 80 7c 04 af 74 03 e9 2b 00 b0 01 bb 00
E1a0 00 8e c3 bb 00 7c e8 67 00 72 1c 81 bf fe 01 55
E1b0 aa 0f 85 58 00 66 8b 44 08 66 03 06 91 e1 66 89
E1c0 44 08 ea 00 7c 00 00 81 c6 10 00 e2 ba 89 fe b9
E1d0 04 00 8a 44 04 3c 05 74 11 3c 0f 74 0d 3c 85 74
E1e0 09 81 c6 10 00 e2 eb e9 23 00 b0 01 31 db 8e c3
E1f0 bb 00 12 e8 1a 00 72 e9 08 e4 75 09 66 8b 6c 08
E200 66 89 2e 91 e1 fe c4 bf be 13 e8 6a ff 5e 59 c3
E210 51 f6 06 95 e1 01 74 0a b9 05 00 e8 24 00 73 0c
E220 e2 f9 b9 05 00 e8 06 00 73 02 e2 f9 59 c3 60 8a
E230 74 01 8b 4c 02 b4 02 cd 13 73 05 31 c0 cd 13 f9
E240 61 c3 60 89 e5 1e 1e 66 8b 0e 91 e1 66 03 4c 08
E250 66 51 06 53 30 e4 50 68 10 00 89 e6 b4 42 cd 13
E260 73 05 31 c0 cd 13 f9 89 ec 61 c3 bb 01 00 fc ac
E270 3c 00 74 06 b4 0e cd 10 eb f5 c3 0a 0d 43 68 61
E280 69 6e 20 62 6f 6f 74 69 6e 67 20 65 72 72 6f 72
E290 00 00 00 00 00 00 00 00 00 00 00 00 00 00 00 00
E2f0 00 00 00 00 00 00 00 00 00 00 00 00 00 00 55 aa
RCX
200
W
Q
Now close the command-prompt window and open up C:\boot.ini in notepad. At the end, add this line:
c:\CHAIN0="Apple Mac OS X x86"
Save and close the file now.
Now you should have a dual-booting machine with Win XP and Mac OS X on it. When you will boot your machine, you will be presented with two operating systems. Note: If you select 'Apple Mac OS X x86', it will give you another boot menu. In this boot menu, you will have to select Mac OS X again, otherwise it would move back to the first boot menu.
If this breaks your computer somehow, please don't blame me. This set up worked perfectly for me and in most cases it should work for you too. If you are stuck and need help, google the error message or the problem you are encountering. You will find a lot of information at osx86project.org and their wiki site. If everything fails, drop me an email and I can try to help you out. If the problem is trivial and easy to solve, I might not reply to your email. I do welcome feedback.
PS: You will find some more screenshots and photos below, in my last post.
posted by Some Desi at 9:45 AM |
![]()